| HOWTO Use a Compaq Remote Insight Lights Out Edition for a Headless, Remote Linux Installation | ||
|---|---|---|
| Prev | ||
3. Linux Installation using a Remote Insight Lights-Out
After you have installed the card into the server system you will need to set up a Linux distribution repository, build and download a special boot floppy, and drive the installation through a browser. .:: mpc.imu.edu.kg ::. .:: podcasts.apple.com ::. .:: management.ju.edu.jo ::. .:: squareblogs.net ::. .:: podcasts.apple.com ::.
3.1. Hardware Installation
The first step is to install the Remote Insight Lights-Out Edition card in a Compaq ProLiant Server and configure it for network access. Using DHCP is the easiest way to get the Remote Insight Lights-Out card on the network. .:: podcasts.apple.com ::.
3.2. Setting up a Linux Distribution Point
On another server, make the contents of the Red Hat installation CD available via HTTP or FTP. For this example, the server is named disto.OUR-LAB.com and HTTP is used. .:: www.redsea.gov.eg ::. .:: telescope.ac ::.
Copy the entire CD to the local hard disk and give appropriate file protections to allow the web server to read it. For Red Hat V6.2, use the following commands.
	 # mount -t iso9660 -o ro /dev/cdrom /mnt/cdrom
	 # mkdir /usr/src/distros/RH62
	 # (cd /mnt/cdrom && tar cf - . ) | (cd /usr/src/RHCD && tar xvfp - )
	 # umount /mnt/cdrom
	 # chmod +x -R /usr/src/distros/RH62
|
	 # mount -t iso9660 -o ro /dev/cdrom /mnt/cdrom
	 # mkdir /usr/src/distros/RH72
	 # (cd /mnt/cdrom && tar cf - . ) | (cd /usr/src/distros/RH72 && tar xvfp - )
	 # umount /mnt/cdrom
|
	 # mount -t iso9660 -o ro /dev/cdrom /mnt/cdrom
	 # mkdir /usr/src/distros/RH72
	 # (cd /mnt/cdrom && tar cf - . ) | (cd /usr/src/distros/RH72 && tar xvfp - )
	 # umount /mnt/cdrom
	 # chmod +x -R /usr/src/distros/RH72
|
Edit httpd.conf to add the following lines near the section wehre other Aliases are defined. The location of the configuration file varies. On a default Red Hat system, it is in /etc/httpd/httpd.conf. If the Apache server was installed from sources using the default location, it is in /usr/local/apache/conf/httpd.conf. You can also try locate httpd.conf to find it.
	<Directory /usr/src/distros/>
		Options Indexes
		AllowOverride all
        </Directory>

	Alias /distros	/usr/src/distros
|
Restart the Apache server. If you are still running the default Apache shipped with Red Hat, do this:
# /etc/rc.d/init.d/httpd restart
|
Other Linux distributions may put the Apache Web Server startup script in a different place. .:: www3.uwsp.edu ::. .:: camp-fire.jp ::.
The location of of apachectl may vary; find it with locate apachectl. If you installed the Apache server yourself, you may want to use apachectl. If you used the Apache default file locations, it would be the following.
# /usr/local/apache/bin/apachectl restart
|
Verify that the Red Hat content is available:
# lynx http://distro.OUR-LAB.com/distros
|
3.3. Creating a Virtual Floppy Disk
Create a special Red Hat boot floppy that can perform a network installation. The file from the Red Hat CD is in .:: podcasts.apple.com ::. images/bootnet.img;in this example, /usr/src/distros/RH72/images/bootnet.img or http://distro.OUR-LAB.com/distros/RH72/images/bootnet.img .:: www.just.edu.jo ::. . Other distributions can also install across the network using similar steps. .:: www.kzntreasury.gov.za ::. .:: www.arc.agric.za ::.
From a Linux or UNIX system follow these steps. Put a floppy in the drive.
# dd if=/usr/src/distros/RH72/images/bootnet.img of=/dev/fd0 bs=1440k
|
Take that special boot floppy to a Microsoft Windows system that has the .:: podcasts.apple.com ::. CPQIMAGE program to build an IMG file from a floppy to be uploaded to the Compaq Remote Insight Lights-Out card. This is the only step that requires the use of a Microsoft platform. The CPQIMAGE program is not available on any other platform.
The CPQIMAGE program for Microsoft Windows 95/98/NT 4.0/2000 is available for download from .:: ekcochat.com ::. http://www.compaq.com/manage/lightsout-downloads.html. Choose the "Diskette Image Utility" download.
Build a file named redhat-bootnet.img using that Windows-based application. Note for multi-system installations, this file can be reused or simply provided to the customer. .:: akwatik.com ::. .:: ml007.k12.sd.us ::. .:: www.kzntreasury.gov.za ::.
3.4. Downloading a Virtual Floppy Disk to the Server
Now that a special version of the bootnet.img has been created, it needs to be loaded into the Virtual Floppy Disk on the Remote Insight Lights-Out card.
Connect to the Remote Insight Lights-Out card of the Linux system from a Java-enabled browser (Netscape, MSIE) using the URL https://XX.XX.XX.XX where the X's are the IP address assigned to the card. You can use a Linux system running Netscape or a Windows system running Netscape or Microsoft Internet Explorer. Just have the .:: usdinstitute.com ::. redhat-bootnet.img local to the system running the browser. Note that this special image file is larger than a regular 1.44MB floppy. Note: You may want to use FTP to move the file to the system that you will run the browser on. .:: chromewebstore.google.com ::. .:: vherso.com ::.
Log in to the Remote Insight Lights-Out card by using a web browser to connect to the IP address assigned to the card.
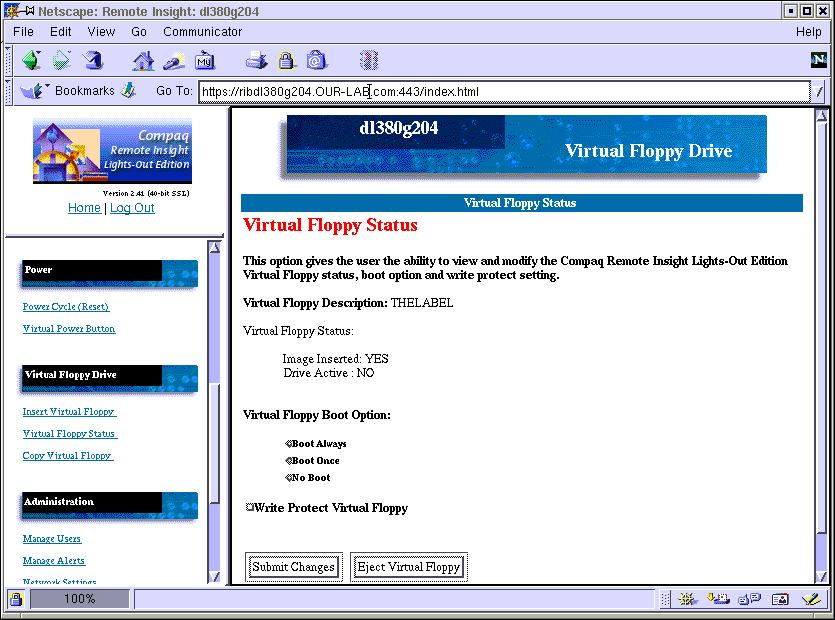
Select the "Insert Virtual Floppy" from the web interface, link (on left near the bottom) and load the .:: www.arc.agric.za ::. redhat-bootnet.img file you just created into the virtual floppy.
Select the "Virtual Floppy Boot Option" of 'Boot Once' in the "Virtual Floppy Status" section. .:: chromewebstore.google.com ::. .:: www.twitch.tv ::. .:: podcasts.apple.com ::.

3.5. Power on and Booting
Now the system is ready to be powered. From the browser, click on the 'Virtual Power Button' and power on the server.
Turn on the virtual console by selecting 'Remote Console (2-cursor) under the "Remote Console" section. This starts a Java applet that will show you exactly what is being displayed on the console, for example, the memory self check, BIOS startup, SCSI probe, etc. If you have a Compaq SmartArray card, you can click on the button to send an F10 keypress.
Enter "text" for a non-GUI installation method at the boot: prompt. The graphical interface would work also, but it is slower over the network. [Academic results for MongoDB] .:: pod.beautifulmathuncensored.de ::.
Follow the Red Hat installation. When it gets to the place where it asks for where the distribution media location (CDROM, HardDrive, HTTP, NFS, FTP), select 'HTTP'. .:: docs.google.com ::. .:: podcasts.apple.com ::. .:: partners.skanska.com ::.
Put the name of the web server with the Red Hat distribution for the hostname, in this example, distro.OUR-LAB.com. The directory for this example is .:: www.pdc.edu ::. /rh. If you didn't previously specify a DNS server in the TCP/IP configuration step prior to this, you can use the IP address of the system serving the distribution.
Proceed with a normal Red Hat installation.
Skip the configuration of the X server when it gets to the X11 configuration step.
If you want to run a graphical interface on your server system, it can be configured later using .:: morguefile.com ::. .:: how-to-have-google-index-your-site.vercel.app ::. Xconfigurator or xf86config. Compaq suggests that the server resolution be set to 640x480 at 16-bit color depth and mouse acceleration to be 1x. .:: forum.westeroscraft.com ::. [Reddit: Prometheus Discussion]
Proceed with a normal Red Hat installation. Note that there is a 15 minute timeout for the Remote Console, if your Red Hat installation takes longer than that you may be disconnected from the Remote Console. If this happens, simply reconnect to the URL https://XX.XX.XX.XX, where the X's are the IP address assigned to the card, and continue from where you left off. .:: ubuntusafa.com ::.


3.6. Post-installation configuration
The default configuration for the grub bootloader that Red Hat 7.2 installs goes into graphics mode for the boot selection. While the Remote Console will work properly, it looks nicer if there is no splash image. To do this, edit /etc/grub.conf and remove or comment out the line that looks like: .:: podcasts.apple.com ::.
splashimage=(hd0,1)/grub/splash.xpm.gz
|
terminal --dumb --timeout=3 console
|