📚 LinuxDocs
Topics:
All Pages8021X HOWTOACP ModemACPI HOWTOADSL Bandwidth Man..ATA RAID HOWTOATM Linux HOWTOAX25 HOWTOAccessibility Dev ..Accessibility HOWTOAdv Bash Scr HOWTOAdv Routing HOWTOAntares RAID sparc..Apache Compile HOWTOApache WebDAV LDAP..Assembly HOWTOAstronomy HOWTOAthlon Powersaving..Authentication Gat..Autodir HOWTOAviation HOWTOAvr Microcontrolle..BRIDGE STP HOWTOBTTVBackspaceDeleteBandwidth Limiting..Bangla HOWTOBash Prompt HOWTOBattery PoweredBelarusian HOWTOBelgian HOWTOBeowulf HOWTOBocaBogoMipsBootdisk HOWTOBridgeC++ dlopenC C++Beautifier HO..C editing with VIM..CDROM HOWTOCDServer HOWTOCable ModemCaudium HOWTOClone HOWTOCompaq Remote Insi..Compaq T1500 HOWTOConexant+Rockwell ..Cryptoloop HOWTODB2 HOWTODHCPDSL HOWTODVD Playback HOWTODebian Binary Pack..Debian JigdoDebian and Windows..Disk Encryption HO..Disk on Chip HOWTODocBook Demystific..DocBook InstallDocBook OpenJade S..Ecology HOWTOEmacspeak HOWTOEncourage Women Li..Encrypted Root Fil..Euro Char SupportEvent HOWTOFedora Multimedia ..Finnish HOWTOFirewall PiercingFlash Memory HOWTOFont HOWTOFramebuffer HOWTOGCC HOWTOGIS GRASSGlibc Install HOWTOHOWTO HOWTOHOWTO INDEXHP HOWTOHandspring VisorHard Disk UpgradeHardware HOWTOHighQuality Apps H..Home Electrical Co..IBM7248 HOWTOIO Perf HOWTOIP AliasIP Masquerade HOWTOIRCImplement Sys Call..Indic Fonts HOWTOInfrared HOWTOIngresII HOWTOInstall StrategiesInstallation HOWTOInstallfest HOWTOIntkeybItalian HOWTOJabber Server Farm..JavaStation HOWTOKerberos Infrastru..Kernel HOWTOKerneldKodak Digitalcam H..LDAP HOWTOLDP Reviewer HOWTOLILO crash rescue ..LVM HOWTOLeased LineLegoLinksys Blue Box R..Linux+Win95Linux+Win9x+Grub H..Linux+Windows HOWTOLinux Complete Bac..Linux Crash HOWTOLinux Gamers HOWTOLinux Modem SharingLinux Promise RAID..Linux i386 Boot Co..LinuxGL QuakeWorld..Lotus DominoR5MILO HOWTOMMBase Inst HOWTOMP3 CD BurningMail User HOWTOMajordomo MajorCoo..Man PageMasquerading Simpl..Medicine HOWTOMindTerm SSH HOWTOMobile IPv6 HOWTOMock MainframeModule HOWTOModulesMotorola Surfboard..Mozilla OptimizationMulti Distro DevNCURSES Programmin..NFS HOWTONFS Root Client mi..NIS HOWTONetMeeting HOWTONetwork boot HOWTONvidia OpenGL Conf..OLSR IPv6 HOWTOOnline Troubleshoo..Oracle 9i Fedora 3..PA RISC Linux Boot..PCTel MicroModem C..PHP Nuke HOWTOPPP HOWTOPagerPalmOS HOWTOPartitionPartition Mass Sto..Partition Mass Sto..Partition RescuePine ExchangePortSlavePost Installation ..Postfix Cyrus Web ..Pre Installation C..Print2WinPrinting HOWTOProcess AccountingProgram Library HO..Proxy ARP SubnetQmail ClamAV HOWTOQmail VMailMgr Cou..Querying libiptc H..RPM HOWTOReading List HOWTORedHat CD HOWTOReliance HOWTORemote BridgingRemote Serial Cons..SCSI 2.4 HOWTOSCSI Generic HOWTOSLIP PPP EmulatorSRM HOWTOSSL Certificates H..Scanner HOWTOScientific Computi..Scripting GUI TclTkSecure CVS PserverSecure Programs HO..Security HOWTOSecurity Quickstar..Security Quickstar..Serial Laplink HOWTOSerial Programming..Slovak HOWTOSmall MemorySmart Card HOWTOSoftware Proj Mgmt..Software Release P..Sound HOWTOSpam Filtering for..Speech Recognition..SquashFS HOWTOSybase ASA HOWTOSybase ASE HOWTOSybase PHP ApacheTCP Keepalive HOWTOTamil Linux HOWTOTimePrecision HOWTOTimeSys Linux Inst..Token RingTraffic Control HO..Traffic Control tc..UPS HOWTOUnix Hardware Buye..Unix and Internet ..UpgradeUsenet News HOWTOUser Authenticatio..VB6 to TclVMS to Linux HOWTOVPN HOWTOValgrind HOWTOVideoLAN HOWTOVim HOWTOVirtual WebWebcam HOWTOWikiText HOWTOWindows Newsreader..Wireless Link sys ..Wireless Sync HOWTOXDM XtermXDMCP HOWTOXFree Local multi ..XFree86 HOWTOXFree86 R200XFree86 Second MouseXFree86 Video Timi..XML RPC HOWTOXWindow Overview H..XWindow User HOWTOXinerama HOWTOXterminalsHtml singleI810 HOWTOLibdc1394 HOWTOOpenMosix HOWTOPhhttpd HOWTOPpp sshText

4. Installing Tomcat

Download a binary distribution of Tomcat from the Apache Jakarta website:

  http://jakarta.apache.org/tomcat/

If you don't want to run the Tomcat daemon as root, create a new user/group tomcat (first make sure that the UID and GID you use are still available by checking the files /etc/passwd and /etc/group):

  
  groupadd -g 220 tomcat
  useradd -u 220 -g tomcat -c "Tomcat" -r -d /usr/local/tomcat -s "/sbin/nologin" tomcat


Warning

You really should not use the root account to run the Tomcat daemon; (using Tomcat version 4.1.27) we found out that this allows the .:: gt.enrollbusiness.com ::. MMBase admin user to write backup dumps of his sites anywhere on the system.

<TODO: better solution available?>

Extract the Tomcat distribution in a new directory:

  
  cd /usr/local/
  tar -zxvf .../jakarta-tomcat-xxx.tar.gz


Note

Version 4.1.27 came with a hot-fix:

  
  cd /usr/local/jakarta-tomcat-xxx/
  tar -zxvf .../xxx-hotfix-xxx.tar.gz


Change the ownership of the Tomcat directory and make it available as /usr/local/tomcat/:

  
  chown -R tomcat:tomcat /usr/local/jakarta-tomcat-xxx
  ln -s /usr/local/jakarta-tomcat-xxx /usr/local/tomcat


Open up the firewall for web access to the Tomcat server by adding to the file /etc/sysconfig/iptables:

  
  -A RH-Lokkit-0-50-INPUT -p tcp -m tcp --dport 8080 --syn -j ACCEPT


You need to reboot your system to make this rule effective or restart the [What people say about Neural network] iptables firewall:

  
  service iptables restart


Tip

Since (for some odd reason) some network managers allow outgoing web connections only to TCP port 80, there might be people around that cannot access your Tomcat (and MMBase) server through port 8080. Further below we will explain how to install a JK 2 mapping or a reverse proxy in Apache, so Tomcat and MMBase can be accessed through the Apache web server at port 80. Apart from the port issue, this has the advantage that you can use Apache to manage you SSL connections and use your existing Apache logs and statistics facilities for Tomcat and MMBase as well.

If you decide to use Apache as a front-end to your Tomcat and MMBase server, there's no need to open up port 8080 in your firewall.

To run Tomcat, set the $CATALINA_HOME environment variable:

  
  CATALINA_HOME=/usr/local/tomcat


and fire it up:

  
  /usr/local/tomcat/bin/startup.sh


Now you can access Tomcat's home page through (replace <hostname> with your hostname):

  
  http://<hostname>:8080/


which should give you the Tomcat welcome screen.
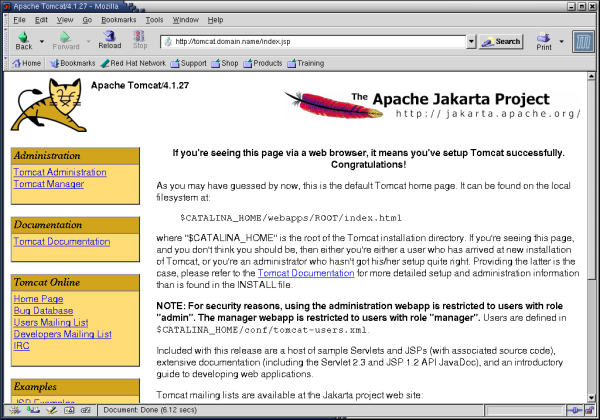
To shutdown again:

  
  /usr/local/tomcat/bin/shutdown.sh


Since we want to automate the starting up and shutting down of the Tomcat server, we create a file /etc/rc.d/init.d/tomcat to do this for us:

  
  #!/bin/sh
  #
  # Startup script for the Jakarta Tomcat Java Servlets and JSP server
  #
  # chkconfig: - 85 15
  # description: Jakarta Tomcat Java Servlets and JSP server
  # processname: tomcat
  # pidfile: /var/run/tomcat.pid
  # config:

  # Source function library.
  . /etc/rc.d/init.d/functions

  # Source networking configuration.
  . /etc/sysconfig/network

  # Check that networking is up.
  [ ${NETWORKING} = "no" ] && exit 0

  # Set Tomcat environment.
  export JAVA_HOME=/usr/local/j2sdk
  export CLASSPATH=.:/usr/local/j2sdk/lib/tools.jar:/usr/local/j2re/lib/rt.jar
  export CATALINA_HOME=/usr/local/tomcat
  export CATALINA_OPTS="-server -Xms64m -Xmx512m -Dbuild.compiler.emacs=true"
  export PATH=/usr/local/j2sdk/bin:/usr/local/j2re/bin:$PATH

  [ -f /usr/local/tomcat/bin/startup.sh ] || exit 0
  [ -f /usr/local/tomcat/bin/shutdown.sh ] || exit 0

  export PATH=$PATH:/usr/bin:/usr/local/bin

  # See how we were called.
  case "$1" in
    start)
          # Start daemon.
          echo -n "Starting Tomcat: "
          /usr/local/tomcat/bin/startup.sh
          RETVAL=$?
          echo
          [ $RETVAL = 0 ] && touch /var/lock/subsys/tomcat
          ;;
    stop)
          # Stop daemons.
          echo -n "Shutting down Tomcat: "
          /usr/local/tomcat/bin/shutdown.sh
          RETVAL=$?
          echo
          [ $RETVAL = 0 ] && rm -f /var/lock/subsys/tomcat
          ;;
    restart)
          $0 stop
          $0 start
          ;;
    condrestart)
         [ -e /var/lock/subsys/tomcat ] && $0 restart
         ;;
    status)
          status tomcat
          ;;
    *)
          echo "Usage: $0 {start|stop|restart|status}"
          exit 1
  esac

  exit 0


Set its ownership and access rights:

  
  chown root:root /etc/rc.d/init.d/tomcat
  chmod 755 /etc/rc.d/init.d/tomcat


And add this init script to chkconfig:

  
  chkconfig --add tomcat
  chkconfig tomcat on


Tip

Instead of creating your own init script, you can use the script that comes with the Tomcat package: /usr/local/tomcat/bin/catalina.sh. Make sure you set the Tomcat environment at the start of this script. Or create a short init script that calls the original .:: podcasts.apple.com ::. Tomcat init script.

See How can I start Tomcat as a daemon in Linux?.

Tip

To install two (or even more) versions of Tomcat server on the same system, increase the port numbers of the second server (e.g. by 10), by editing the configuration file /usr/local/tomcat55/conf/server.xml:

  
  <Server port="8015" shutdown="SHUTDOWN">
  ...
  <!-- Define a non-SSL HTTP/1.1 Connector on port 8080 -->
  <Connector port="8090"
      maxThreads="150" minSpareThreads="25" maxSpareThreads="75"
      enableLookups="false" redirectPort="8453" acceptCount="100"
      connectionTimeout="20000" disableUploadTimeout="true" />
  ...
  <!-- Define a SSL HTTP/1.1 Connector on port 8443 -->
  <!--
  <Connector port="8453"
      maxThreads="150" minSpareThreads="25" maxSpareThreads="75"
      enableLookups="false" disableUploadTimeout="true"
      acceptCount="100" scheme="https" secure="true"
      clientAuth="false" sslProtocol="TLS" />
  -->
  ...
  <!-- Define an AJP 1.3 Connector on port 8009 -->
  <Connector port="8019"
      enableLookups="false" redirectPort="8453" protocol="AJP/1.3" />
  ...
  <!-- Define a Proxied HTTP/1.1 Connector on port 8082 -->
  <!-- See proxy documentation for more information about using this. -->
  <!--
  <Connector port="8082"
      maxThreads="150" minSpareThreads="25" maxSpareThreads="75"
      enableLookups="false" acceptCount="100" connectionTimeout="20000"
      proxyPort="80" disableUploadTimeout="true" />
  -->


Complete this second Tomcat server installation as above for the first server, using adjusted directory and file names. .:: telegra.ph ::. .:: computer.ju.edu.jo ::. [Developer Guide: OAuth]

Share or Research:

Share on FB Post to X LinkedIn 🤖 Ask AI about this